
Despite the hype, virtual sampling is a predictive tool, not a replacement for the physical truth of a prototype.
- Digital models can’t replicate the unpredictable dialogue between fabric, gravity, and human movement (the « kinetic truth »).
- True durability, haptic feedback, and complex fit issues like posture-related drag lines are only revealed through physical interaction.
Recommendation: Implement a hybrid « physical-first, digital-second » workflow. Use an approved physical prototype as the « source of truth » to create a digital twin for rapid, low-risk iterations on color and graphics, not for fundamental fit or material validation.
For any product developer in the fashion industry, the pressure to accelerate timelines and cut costs is immense. Virtual sampling, with its promise of instant 3D renderings and reduced waste, presents itself as the logical evolution, a way to leapfrog the slow, costly process of creating physical prototypes. The allure of designing, fitting, and approving a garment entirely within a digital environment is powerful, and many brands are investing heavily in this technology.
The common wisdom suggests a linear path: use digital for early-stage visualization and reserve physical samples for the final sign-off. However, this perspective often overlooks a fundamental distinction. A virtual sample is a simulation—an incredibly sophisticated prediction based on data. A physical prototype is a confrontation with reality. It is the only true test of how materials interact with gravity, how a seam holds under stress, and how a garment feels and behaves on a moving, three-dimensional human body.
But what if the key to efficiency wasn’t about replacing the physical with the digital, but about redefining their relationship? The real strategic advantage lies not in eliminating the prototype, but in leveraging its irreplaceable role as the arbiter of quality to make digital tools more powerful. This isn’t about choosing one over the other; it’s about building an intelligent workflow where the physical world validates the digital, not the other way around.
This article provides a reality check for product developers. We will explore the critical tests that only a physical prototype can pass, from extreme wear testing to diagnosing complex fit issues. By understanding these non-negotiable checkpoints, you can build a faster, more cost-effective, and higher-quality development process that strategically integrates both digital and physical tools.
Summary: The Enduring Role of Physical Prototypes in Quality Assurance
- How to Conduct a Wear Test That Reveals Durability Issues?
- The Costly Mistake of Skipping the Toile Stage in Luxury Design
- How to Create Professional Prototypes on a Shoestring Budget?
- 3D Printing vs Hand Sewing: Which Prototyping Method Suits Accessories?
- How to Write Fit Comments That Factories Will Understand Correctly?
- What Causes the « Drag Line » on Trousers and How to Fix It?
- How to Speed Up Sampling by 50% Using Digital Twins?
- How to Implement Sustainable Production Without Doubling Your Costs?
How to Conduct a Wear Test That Reveals Durability Issues?
A digital avatar can show how a garment drapes on a static form, but it cannot tell you how a seam will feel against the skin after eight hours of wear, or whether a zipper will survive being packed into a suitcase a dozen times. Durability and long-term comfort are born from kinetic truth—the unpredictable stresses of real-world use. Conducting a rigorous wear test on a physical prototype is not just a quality check; it’s a critical process of failure point discovery that protects brand reputation and reduces costly returns.
The goal is to move beyond simple fit approval and simulate a product’s entire lifecycle in a compressed timeframe. This involves recruiting testers who represent the target activity profile—not just the target demographic. A runner testing a jacket will provide more valuable feedback on fabric breathability and seam chafing than a casual wearer. The test protocol should include both standardized stress tests and sensory feedback, capturing data that digital tools are blind to, such as fabric sound during movement or odor retention.
By isolating and testing individual components—cycle-testing zippers, conducting color-fastness tests on buttons, and applying measured tension to straps—you can preemptively identify weak points. Controlled degradation tests using abrasion surfaces or UV exposure chambers provide objective data on how the materials will age. This level of physical analysis is the only way to truly validate that a product is built to last.
Your Action Plan: The 5-Step Extreme Wear Testing Protocol
- Recruitment: Recruit testers who already engage in your target activities regularly (e.g., runners, yogis, commuters) rather than asking non-users to test.
- Scenario Design: Design scenario-specific stress tests like 10 suitcase pack/unpack cycles or 8-hour continuous wear monitoring.
- Sensory Feedback: Create sensory feedback scorecards to rate non-visual aspects: fabric sound during movement, odor retention, and seam comfort against skin.
- Component Isolation: Isolate component failure points by cycle-testing zippers, color-fastness testing buttons, and applying measured tension to straps.
- Controlled Degradation: Implement controlled degradation protocols using specific abrasion surfaces, UV exposure chambers, and velcro snagging tests.
The Costly Mistake of Skipping the Toile Stage in Luxury Design
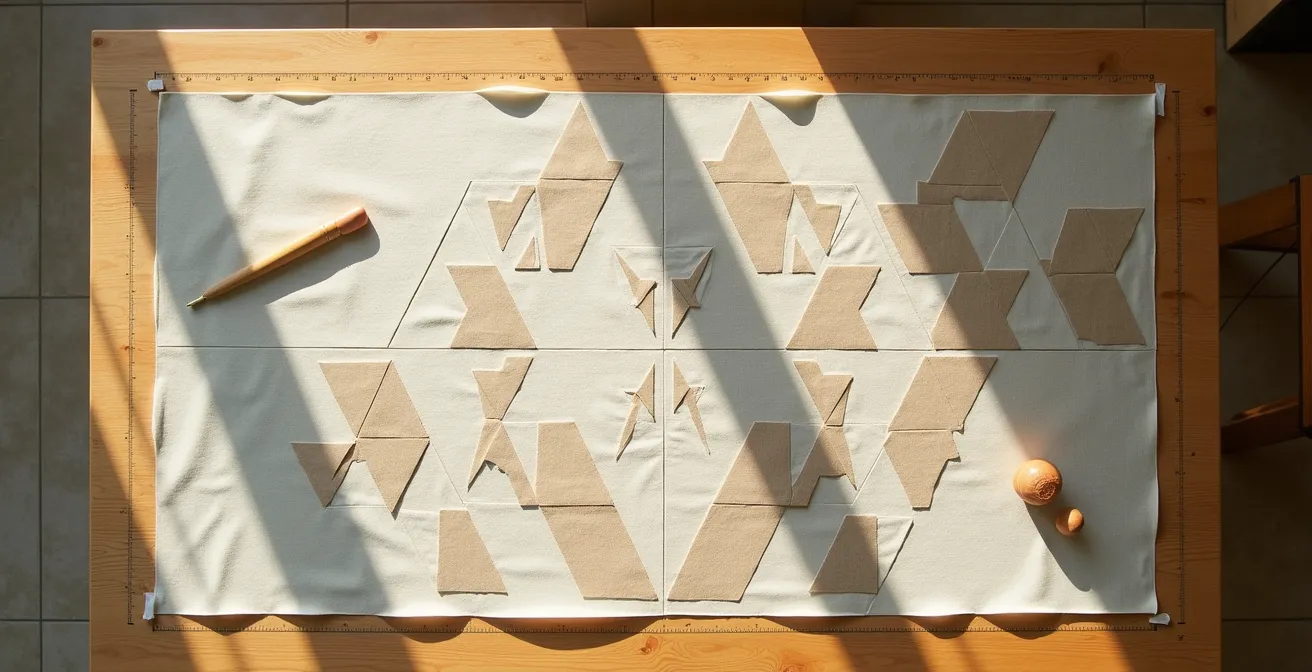
In the pursuit of speed, it’s tempting to see the toile—an early-stage, unbleached cotton prototype—as an archaic step that can be replaced by 3D software. This is a profound misunderstanding of its function, especially in high-end or structurally complex design. The toile is not merely a « first draft »; it is the initial phase of the material dialogue, where the designer, fabric, and gravity collaborate to find the optimal form. Skipping this stage in favor of a purely digital workflow robs the design of serendipity and introduces significant downstream risks.
Software operates on predictable inputs. A physical toile, draped and manipulated by hand on a mannequin, is subject to the unpredictable laws of physics. This hands-on process often leads to « happy accidents »—unintentional folds, unexpected drapes, or new silhouettes that a designer could not have conceived in a sterile digital environment. It is a sculptural process that reveals construction challenges and opportunities invisible on a screen.
Case Study: Discovering Form Through Toile Draping
A recent study on shape-changing fashion highlights this perfectly. Designers combining coded shirring with zero-waste cutting found that draping toile directly on a mannequin was essential. A physical manipulation revealed construction challenges that were completely invisible in the design software. This process not only solved problems but also created unintentional folds that ultimately enhanced the final design’s aesthetic, a discovery that would have been impossible through digital simulation alone.
This tactile exploration builds a designer’s haptic intelligence—an intuitive understanding of how a specific material wants to behave. For luxury items where the feel and fall of the fabric are paramount, this physical interaction is non-negotiable. The toile is where the soul of the garment first takes shape, long before the final fabric is ever cut.
How to Create Professional Prototypes on a Shoestring Budget?
The primary argument against physical prototyping is often its perceived cost. Factory-made samples can indeed be expensive, especially for emerging brands or small collections. However, framing this as an all-or-nothing expense is a false dichotomy. A strategic, resourceful approach can yield high-quality physical prototypes without breaking the bank, providing the essential feedback needed to mitigate the much greater risk of producing a flawed product.
One of the most effective strategies is to deconstruct existing high-quality garments. Sourcing second-hand pieces with similar construction allows you to reverse-engineer professional techniques and use their components as a pattern base. This provides a level of accuracy that is far superior to sketching from scratch. Another hack is to create targeted prototypes of only the most critical fit areas, such as a complex collar or the armscye of a sleeve, while using sketches or digital renderings for the less complex parts of the garment. This focuses resources where they matter most.
Furthermore, the maker economy has opened up new avenues for low-cost access to industrial equipment. Partnering with local fashion schools or community makerspaces during their off-peak hours can provide access to professional-grade sewing machines and cutting tables for a fraction of the cost of owning them. These creative solutions prove that the barrier to physical prototyping is often one of imagination, not just budget.
This table compares several cost-effective methods, demonstrating that professional-quality results are achievable at various budget levels.
| Method | Initial Cost | Time Investment | Quality Level |
|---|---|---|---|
| DIY with Staples/Tape | Under $50 | 2-4 hours | Low-fidelity concept |
| Community Makerspace | $100-200/month | 8-12 hours | Near-professional |
| Fashion School Partnership | $50-100/session | 4-6 hours | Professional quality |
| Deconstructed Garment Base | $30-80 per piece | 6-10 hours | High accuracy |
3D Printing vs Hand Sewing: Which Prototyping Method Suits Accessories?
When it comes to accessories like bags, belts, and hardware, the prototyping debate shifts. Here, 3D printing emerges as a powerful digital tool. However, even in this domain, it serves as a complement to, not a replacement for, traditional hand-sewn methods. Choosing the right method depends entirely on what aspect of the product you need to validate: its mechanical form or its human interaction.
3D printing is unparalleled for rapidly iterating on form and function. It’s ideal for testing the precise geometry of a custom clasp, the volume of a handbag, or the ergonomics of a handle. By adjusting infill densities, you can even get a rough approximation of the final product’s weight. This allows for quick, low-cost validation of mechanical parts and overall structure before committing to expensive molds or tooling.
However, a 3D-printed model offers limited haptic intelligence. It cannot replicate the suppleness of leather, the drape of a fabric strap, or the feel of a component against the skin. For testing these crucial sensory aspects, hand-sewing a prototype from actual or similar materials remains essential. Only a hand-sewn sample can answer questions about flexibility, comfort, and the authentic feel of the materials—qualities that define the user’s experience with a premium accessory.
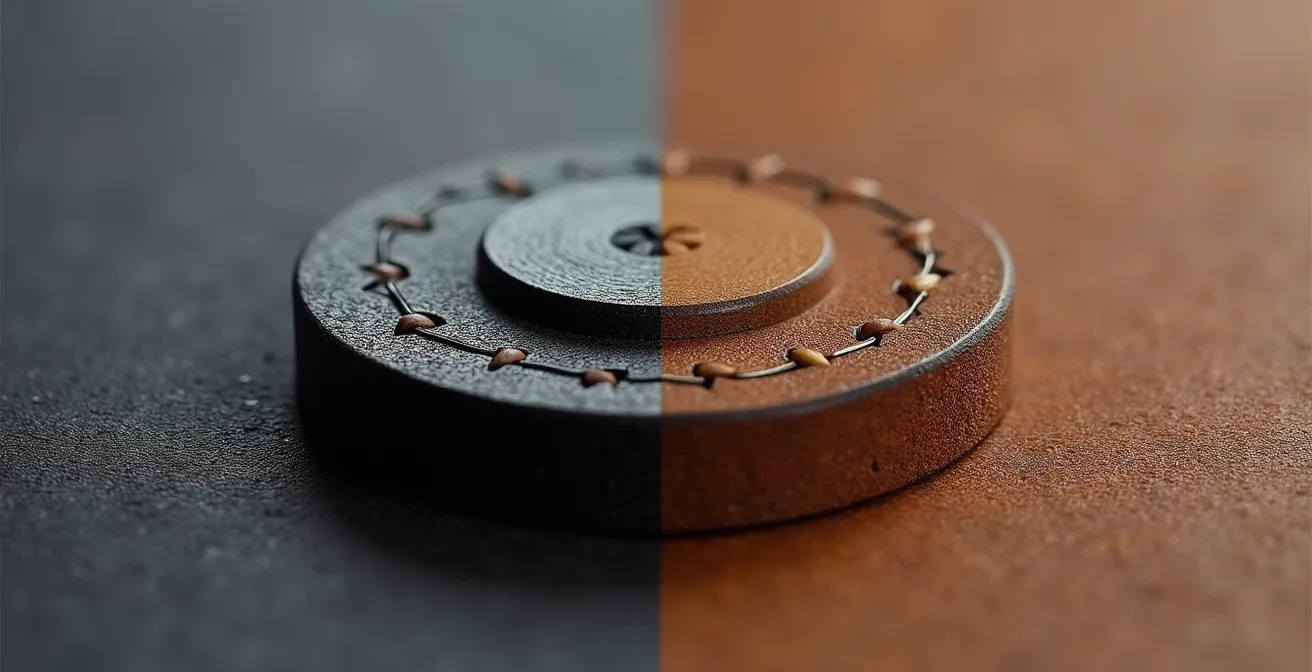
The image above perfectly illustrates this distinction: the sterile precision of the 3D-printed surface on the left versus the rich, organic texture of the hand-stitched leather on the right. One tests the idea; the other tests the reality.
The choice between these methods is a strategic one, focused on what you need to learn at each stage of development.
| Aspect | 3D Printing | Hand Sewing |
|---|---|---|
| Best For | Form testing, mechanical parts, clasps | Material feel, flexibility testing, skin contact areas |
| Speed | Rapid iterations within hours | Days for complex pieces |
| Haptic Testing | Limited tactile feedback | Full sensory experience |
| Weight Simulation | Variable infill densities possible | Add weights manually |
| Material Cost | $50-200 per prototype | $20-100 depending on materials |
How to Write Fit Comments That Factories Will Understand Correctly?
One of the most significant hidden costs in product development is the endless back-and-forth of sample corrections caused by miscommunication with factories. Language barriers and the ambiguity of written instructions can lead to multiple, frustratingly inaccurate sample rounds. This is where the physical prototype transitions from a design tool to the ultimate source of truth in the manufacturing process.
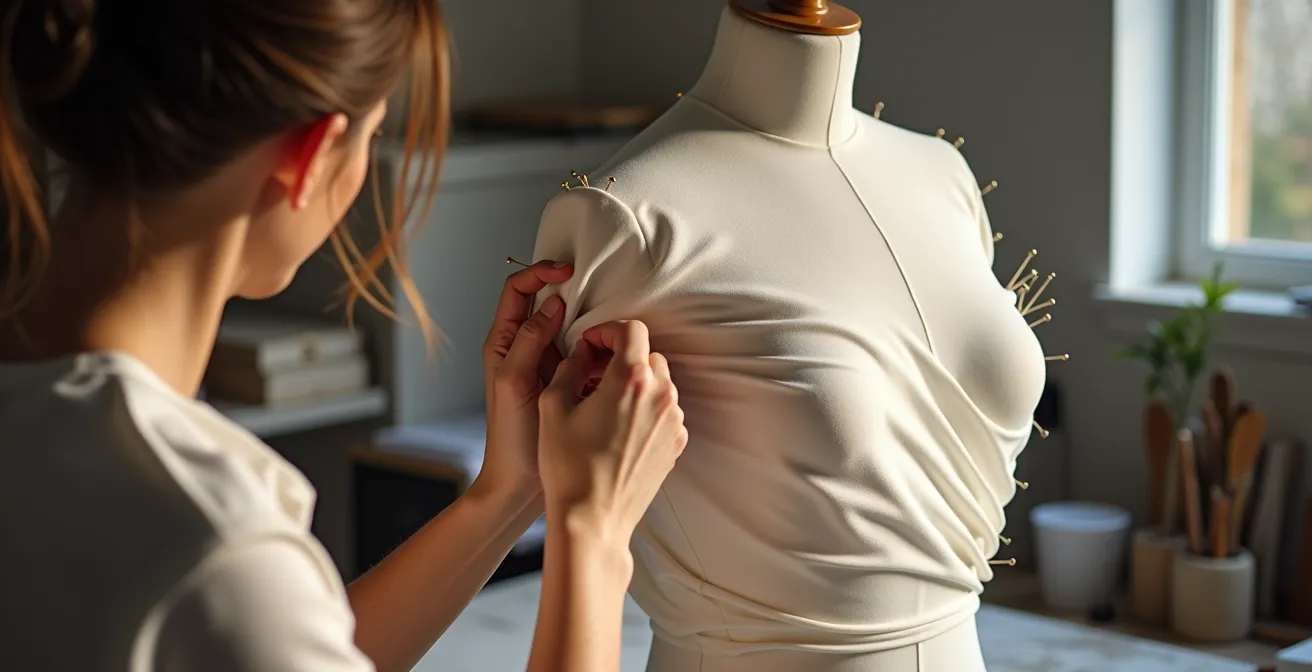
Relying solely on measurement tables and written comments is a recipe for error. The most effective communication protocol is visual and tactile. The « gold standard » involves pinning the physical garment directly on a model or mannequin to show the exact adjustment needed, and then photographing or videoing that specific change. A video log that shows a fit issue in real-time— »see how the fabric pulls when the arm is lifted »—transcends language barriers in a way that text never can.
A powerful technique is the « before-and-after » system: a photo of the incorrect fit is placed next to a photoshopped image or a clear drawing of the desired correction. This provides an unambiguous visual target. Ultimately, the most foolproof method is to treat the annotated physical sample as « the law. » By marking the prototype with colored tape, notes, and pins indicating the precise adjustment zones and sending it back to the factory, you create a 3D instruction manual that leaves no room for interpretation. This practice has a proven impact on efficiency, with some brands achieving a significant reduction in sampling rounds by up to 50% through these clear, visual communication methods.
Supplementing precise measurements with sensory language analogies can also bridge the gap. Instead of just saying « use a softer fabric, » a comment like « this should drape like water, not like cardboard » provides qualitative context that helps the factory understand the desired end-feel. The physical sample becomes the anchor for a shared understanding of quality.
What Causes the « Drag Line » on Trousers and How to Fix It?
Drag lines—those unsightly diagonal creases that pull across the fabric of trousers—are a perfect microcosm of why physical fitting is irreplaceable. In a digital environment, it’s easy to assume these lines are purely a pattern-making flaw. A 3D avatar, with its perfect posture and symmetrical build, might not show any issues. However, the moment a physical prototype is worn by a real person, the kinetic truth emerges.
Physical fittings often reveal that drag lines are caused by individual posture variations, such as a tilted pelvis, uneven hips, or the way a person stands, rather than just an error in the pattern. These are nuances of the human form that a generic digital avatar simply cannot account for. A live fit session allows a skilled pattern maker to diagnose the root cause in real time. Diagonal lines pulling from the hip might indicate a pattern imbalance, while horizontal lines under the seat suggest the back rise is too short.
Case Study: Dynamic Drag Lines Revealed in Live Fittings
In physical fittings, designers observed that static analysis was insufficient. It was only during movement tests—asking the model to sit, walk, and climb stairs—that certain « dynamic » drag lines appeared. These issues, completely invisible on a static 3D model, were critical to creating a garment that not only looks good standing still but also performs comfortably in real life. The fitting process became an investigation, involving rotating pattern pieces slightly on the fabric grain to see how different materials created varying drag patterns.
Fixing drag lines is not just about adjusting a digital file. It’s an interactive process of pinning the fabric on a live model, observing the change in drape, and understanding the interplay between the pattern, the material’s bias, and the wearer’s unique body. This hands-on diagnostic work is a form of haptic intelligence that is essential for creating a truly perfect fit, something a screen-based process cannot yet replicate.
Key Takeaways
- Physical is Reality, Digital is Prediction: A physical prototype is the only true test against the unpredictable laws of physics and human interaction.
- The Hybrid Model is Key: Use a « physical-first, digital-second » workflow. Approve fit on a physical sample, then use its digital twin for rapid color and graphic iterations.
- Communication is Visual: Reduce sample rounds by using the annotated physical prototype as the « source of truth » for factory communication, supplemented by photos and videos.
How to Speed Up Sampling by 50% Using Digital Twins?
Acknowledging the irreplaceable value of physical prototypes does not mean rejecting digital tools. The most forward-thinking and efficient approach is a hybrid one that leverages the strengths of both. The concept of a « digital twin » is at the heart of this strategy, but its successful implementation depends on getting the workflow right: physical first, digital second. This model allows brands to maintain high-quality standards while drastically accelerating the development cycle.
The process begins by creating and perfecting a physical prototype for fit, feel, and construction. Once this « source of truth » is approved, it is 3D scanned to generate a highly accurate digital twin. This digital model then becomes the baseline for rapid, low-risk iterations. Instead of creating new physical samples for every colorway or graphic placement, these variations can be visualized and approved on the digital twin with high confidence. This is where the speed and cost savings are realized. As evidence of this shift, a report noted that for major retailers like Macy’s, as many as 61% of their samples were created virtually in 2022.
Case Study: The Physical-First, Digital-Second Workflow
Leading fashion brands are implementing a hybrid workflow that has been shown to cut overall sampling time by as much as 50%. The rule is simple: any change that affects fit, drape, or core construction (e.g., modifying a seam, changing fabric type) automatically triggers a new physical checkpoint. However, simple changes like altering a stitch color or testing a new print are approved digitally. The 3D scan of the approved physical sample serves as a 360-degree reference for the factory, ensuring the digital changes are applied to a proven, well-fitting base.
This intelligent integration turns the digital twin from a speculative design tool into a powerful production tool. It frees up resources from redundant sampling and focuses physical prototyping on what it does best: validating the core integrity of the product. It’s not about elimination; it’s about smart allocation of resources.
How to Implement Sustainable Production Without Doubling Your Costs?
Sustainability in fashion is often linked to material choices or end-of-life recycling. However, the prototyping stage itself plays a pivotal, often overlooked, role in building a more sustainable production model. Far from being a wasteful step, strategic physical prototyping is a direct path to reducing waste, extending product lifespan, and innovating with next-generation materials without incurring prohibitive costs.
Firstly, the physical prototyping stage acts as a crucial material lab. Many emerging sustainable materials, from mycelium leather to orange fiber silk, lack the standardized data needed for accurate virtual simulation. Hands-on prototyping is the only way for designers to understand the workability, drape, and durability of these new textiles. This tactile process also enables zero-waste pattern experiments, as designers can physically manipulate pattern pieces on fabric mockups to minimize offcuts, a task that is far more intuitive in the physical world.
Secondly, robust physical testing is the foundation of product longevity. A product that lasts longer is inherently more sustainable. As research from textile testing experts shows, implementing comprehensive durability testing protocols can lead to a 50% reduction in product-related waste by preventing premature failure. This is directly tied to the wear-testing conducted on physical prototypes, where potential weaknesses in seams, fabrics, and hardware are identified and engineered out before mass production.
Finally, designers can use the prototype to plan for a circular future by testing for disassembly. During this phase, they can check if components can be easily separated for recycling or if panels can be replaced for repair—a level of practical, physical assessment that virtual tools are not designed to perform. By integrating these considerations early, sustainability becomes a core part of the design DNA, not an expensive afterthought.
Therefore, the next logical step is not to eliminate the physical sample, but to redefine its role. Audit your current development process to identify where physical checkpoints provide irreplaceable value and where digital tools can genuinely accelerate decisions without compromising the integrity of the final product.