
Draping builds a ‘material intelligence’ that flat-pattern drafting cannot, transforming you from a sketch-translator into a fabric-first designer.
- It forces you to confront gravity and fabric personality from the first pin, eliminating the gap between a 2D idea and 3D reality.
- The process is a physical dialogue that allows for the discovery of shapes and forms that are impossible to predict or draw on paper.
Recommendation: Prioritize a foundational draping course. It doesn’t replace pattern making, but it provides the essential, tactile understanding that makes all subsequent design work more successful.
As a fashion student, you live in a world of beautiful, impossible sketches. You draw flowing lines and dramatic silhouettes, only to find them fall flat, lifeless, or simply wrong when you try to translate them into fabric. This frustrating gap between your 2D vision and 3D reality is a universal experience. The conventional wisdom is to learn better pattern-making, to become more precise with your rulers and calculations. But this approach often doubles down on the problem, treating fabric as a passive, two-dimensional surface to be commanded.
What if the solution isn’t to draw better, but to listen better? This article proposes a fundamental shift in perspective. The true mastery of fashion design isn’t about forcing fabric to obey a sketch; it’s about entering into a physical dialogue with the material itself. This is the core of draping. It’s not just another method; it’s a foundational education in the language of fabric—its weight, its personality, its relationship with gravity. While pattern making teaches you the geometry of a garment, draping teaches you its soul.
We will explore how this tactile conversation with fabric solves the fundamental failures of sketch-to-garment translation. We’ll examine how it allows for the discovery of shapes you can’t even draw and why, even in the age of 3D software, this hands-on skill remains irreplaceable. This isn’t an argument to abandon pattern making, but to understand why draping must come first, as the intuitive foundation upon which all technical skill is built.
This guide breaks down the essential ways draping cultivates a deeper, more intuitive design sense. Explore the full structure below to understand how this tactile skill will fundamentally elevate your craft.
Summary: Why Draping Is the Foundational Skill for Understanding Fabric
- Why Your Sketches Fail When Translated to Fabric?
- How to Drape a Bias Cut Dress Without Twisting the Grain?
- Which Dress Form Should You Buy for Professional Draping?
- The Grainline Distortion That Ruins the Hang of a Draped Garment
- When to Transfer Your Drape to Paper for Finalizing?
- How to Use Draping to Discover Shapes You Can’t Draw?
- Flat Pattern Making vs Draping: Which Yields Better Results for Tailoring?
- Why Virtual Sampling Is Not Yet Enough to Replace Physical Prototypes?
Why Your Sketches Fail When Translated to Fabric?
Your sketchbook is a world without gravity. The lines you draw can defy physics, and the fabric you imagine has no weight, no bias, no rebellious personality. This is the primary reason your designs fail: a sketch is a two-dimensional lie. Draping, in contrast, is a conversation with truth from the very first pin. It forces you, as a designer, to work with gravity as a partner, not an afterthought. You immediately feel the pull, see the weight, and learn how the textile wants to fall. This isn’t theoretical; it’s a tangible lesson in material physics.
The most common failure point in flat-patterning from a sketch is ease. You calculate, you measure, but the life of the garment in motion is missing. In fact, educational studies show that 70% of beginner designers underestimate the necessary wearing ease by several centimeters. Draping bypasses this pitfall by building ease organically. You aren’t adding a number; you’re creating physical space, feeling with your own hands the difference between a garment that encases a body and one that moves with it. This builds a tactile memory that no textbook can provide.
Ultimately, a flat pattern is a map, but draping is the act of exploring the territory. By starting with the fabric on the form, you build a mental library of how different materials behave. You learn that chiffon is a liar that stretches when you look away, that wool crepe has a friendly weight that loves to be molded, and that silk charmeuse is a fluid conversationalist. This is material intelligence, and it’s the most valuable skill draping teaches—the intuitive knowledge that will eventually allow your hands to know what a fabric will do before you even unroll it from the bolt.
Action Plan: Build Your Mental Fabric Library
- Week 1: Drape five different fabric weights daily, noting the difference in their behavior and hang.
- Week 2: Practice blindfolded fabric identification to train your tactile memory for texture and weight.
- Week 3: Before touching a new fabric, try to predict its drape behavior, then verify your prediction by draping it.
- Week 4: Mix different fabrics in a single drape to understand how their weights and textures interact.
- Week 5: Create a swatch book, documenting each fabric’s ‘personality’ with physical samples and detailed draping notes.
How to Drape a Bias Cut Dress Without Twisting the Grain?
The bias cut is the ultimate expression of a fabric’s fluidity, but it is also a masterclass in tension and gravity. Draping a bias-cut dress without the grain twisting into a spiral mess is not about forcing the fabric into submission; it’s about listening to it. The secret is to understand that the fabric must hang and settle under its own weight. Before you even begin to shape the garment, you must let the fabric tell you where it wants to go. Pin the top edge, and then step away. Let gravity do its work. The material will drop, stretch, and find its natural vertical hang. Only then can your fabric dialogue begin.
This principle was perfected by Madeleine Vionnet, the undisputed ‘Queen of the Bias Cut’. Her revolutionary approach involved shunning corsets and creating body-skimming gowns through intricate draping. A key part of her method, as detailed in studies of her innovative techniques, was working on quarter-scale mannequins. This allowed her to understand the behavior of the bias grain with smaller, more manageable pieces of fabric. She would perfect the hang and flow in miniature, solving problems of twist and tension before scaling the design up, a process of rapid, low-waste prototyping.
For the student, the modern lesson here is to respect the « cooling period. » After you have draped your initial shape, let the garment hang on the form overnight. The bias is alive; it will stretch and settle in ways you cannot predict in a single session. When you return, you will see where the grain has pulled and where the tension is fighting you. Adjusting the drape after this settling period is crucial. It’s a process of gentle persuasion, not brute force, nudging the grainlines back into a balanced, harmonious fall that honors the fabric’s nature.
Which Dress Form Should You Buy for Professional Draping?
Your dress form is not just a tool; it is the silent partner in your creative dialogue. It is the body, the canvas, and the foundation upon which your fabric conversations will take place. Choosing the right one is therefore less about features and more about potential. The most important factor for a student is not finding a form that is a perfect match to a specific size, but one that provides a solid, reliable base that can be adapted. Look for a form made of sturdy materials with a pinnable surface—canvas or linen is ideal—that can withstand constant pinning and manipulation without crumbling.
A common mistake is buying a form that is too large or exactly the target measurement. This leaves no room for maneuver. As a professional draper will tell you, the key is to start slightly smaller than your desired size. As one expert in a fashion draping guide advises:
Start with a form that’s as similar as possible to your measurements, but not larger. You can pad a dress form, but you can’t squeeze it down to get to the right size.
– Fashion Draping Expert, Fashion Draping Tutorial Guide
This ability to pad is your secret weapon. Using batting and a fitted cover, you can build up the bust, waist, or hips to perfectly match your desired measurements or to replicate the unique contours of a real human body. This process itself is a lesson in anatomy and form. You are not just draping on a generic shape; you are sculpting the body you intend to dress, making you more conscious of posture, curves, and asymmetry. A professional form with clear, accurate seam lines marked is also invaluable, as these become your landmarks, your points of reference in the landscape of the body.
The Grainline Distortion That Ruins the Hang of a Draped Garment
The grainline is the soul of the fabric, the internal architecture of warp and weft threads that dictates its structure and stability. When you drape, you are in a constant negotiation with this architecture. Unintentional grainline distortion is what happens when this negotiation breaks down. It’s that subtle, often unnoticed pulling and twisting that occurs when you force fabric against its natural will. It might look fine on the dress form, but on a moving body, it manifests as seams that torque, hems that rise unevenly, and a silhouette that feels inexplicably « off. »
Diagnosing this distortion is a tactile skill. You must learn to read the fabric with your fingertips. As you smooth the muslin over the form, feel for areas of unnatural tightness. Look closely at the weave itself. Are the threads still forming a perfect grid, or are they pulling into tiny parallelograms? The moment you see that distortion, you’ve found a point of tension—an argument between your design and the fabric’s integrity. It is in this microscopic space that garments are made or ruined.
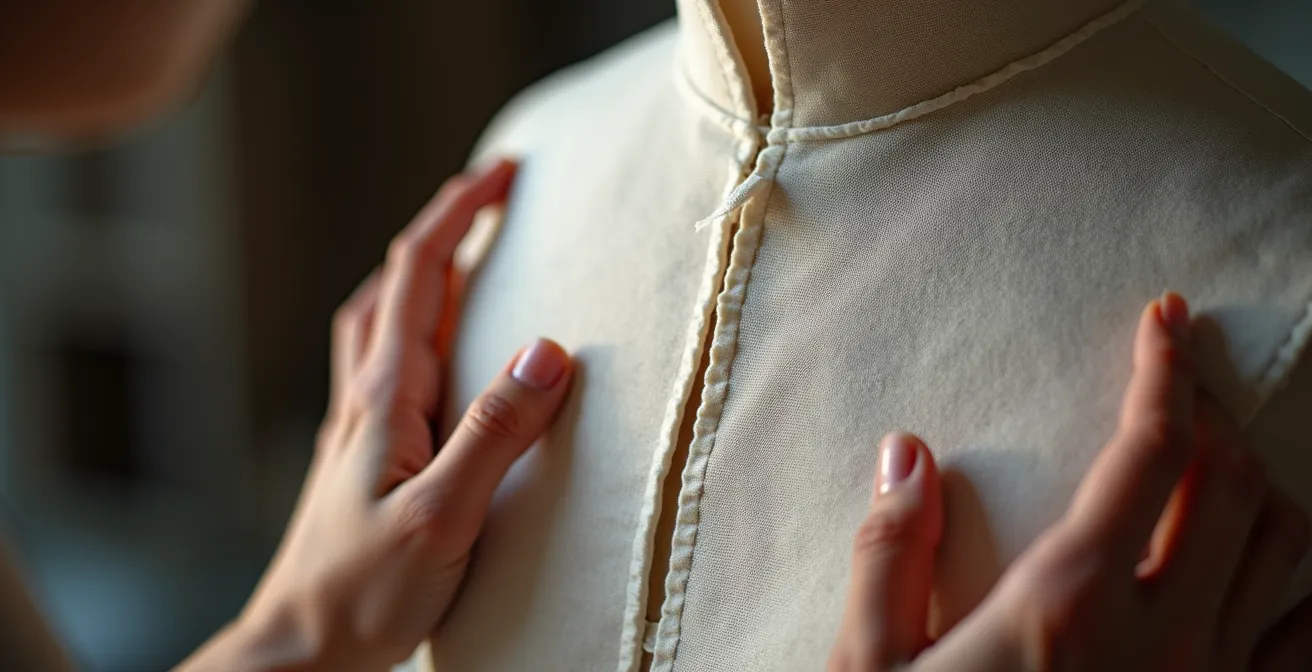
As this close-up view reveals, the stress on the threads is visible long before a major wrinkle appears. However, what is a mistake for a novice can be a tool for a master. Designers like Rei Kawakubo of Comme des Garçons have built an entire aesthetic around intentional grain distortion. By pinning and manipulating the fabric before it even touches the mannequin, Kawakubo creates sculptural volumes and organic forms that defy traditional construction. She doesn’t just accept distortion; she weaponizes it, turning a structural « error » into the main design element. This demonstrates the highest level of material intelligence: knowing the rules of grain so intimately that you know exactly how and when to break them for artistic effect.
When to Transfer Your Drape to Paper for Finalizing?
There is a moment in the draping process when the conversation with the fabric quiets down. The major questions of silhouette and volume have been answered, and you are left with the quiet work of refinement. Knowing when this moment has arrived—when the drape is truly « finished » and ready for paper—is one of the most difficult intuitions for a student to develop. Rushing to paper too soon means you fossilize an incomplete idea. Waiting too long can lead to overthinking and losing the initial spark of spontaneity.
The decision is a blend of artistic feeling and technical verification. It is, as one master draper shared, an iterative process of refinement. They confessed, « I never transfer until I’ve photographed the drape from 8 angles and can’t find a single adjustment to make. » This speaks to the emotional side of the decision: you transfer when you can no longer find fault, when the shape feels resolved and confident from every viewpoint. It’s when the dialogue has reached a satisfying conclusion and there is nothing more to say.
This intuitive feeling must be backed by a rigorous, objective check. Before a single pin is removed, you must perform a final audit of the garment’s key properties. This checkpoint system ensures that the beauty of your drape is matched by its technical viability as a wearable piece of clothing. It is the bridge between your three-dimensional creation and its two-dimensional blueprint.
Your Pre-Transfer Audit Checklist
- Balance Check: Measure from the center front to the side seams on both left and right sides. Any variance should be under 0.5cm to ensure symmetry.
- Ease Assessment: Carefully insert two fingers between the fabric and the dress form at the bust, waist, and hip points to verify adequate wearing ease.
- Flow Test: Walk a full 360 degrees around the form, observing the silhouette from all angles and under different lighting conditions to check for unintended bumps or dips.
- Cooling Period: Allow the draped garment to hang on the form overnight. This lets the fabric settle and reveals any hidden tension or bias dropping before you commit.
- Final Marking: Use a clear, color-coded system on the muslin (e.g., red for seamlines, blue for grainlines, green for notches) before you even think about removing it.
How to Use Draping to Discover Shapes You Can’t Draw?
The most profound gift of draping is its ability to reveal the « unplannable shape. » A sketch is limited by your imagination and your drawing skill. You can only create what you can already conceive. Draping, however, is a process of co-creation with the fabric and with chance. By twisting, folding, and manipulating the material directly on the form, you open yourself up to happy accidents—unforeseen folds, unexpected volumes, and surprising silhouettes that you never would have thought to draw.
This is not a flaw in the process; it is the very heart of its creative power. You might be trying to create a simple pleat, but the fabric’s weight causes it to collapse into a beautiful, organic cascade. That cascade is a discovery, a shape gifted to you by the material itself. As the DOT School of Design notes, « Draping is considered a free-form method that allows designers to experiment and refine their designs organically… fostering creativity and spontaneity. » It is the act of designing through action rather than pre-conception. You are not just executing a plan; you are on a journey of discovery with the fabric as your guide.

This moment of discovery is what separates a technician from an artist. It’s the point where your hands are moving, guided by an intuition built from hours of practice, and suddenly the fabric does something new. It presents a possibility you hadn’t considered. This is why draping is so critical for avant-garde and couture design. It is a method for generating novelty. You are not just making a dress; you are sculpting with cloth, and in the process, you may find yourself creating a form that is entirely new, a shape that could only be born from this physical, three-dimensional dialogue.
Flat Pattern Making vs Draping: Which Yields Better Results for Tailoring?
In the precise world of tailoring, with its emphasis on structure and fit, the debate between draping and flat pattern making becomes particularly nuanced. It’s not a question of which is « better, » but which tool is right for which part of the conversation. A tailored jacket is a complex ecosystem of curves and angles, and a hybrid approach that leverages the strengths of both methods almost always yields superior results. The flat pattern provides mathematical precision, while draping provides the intuitive understanding of a three-dimensional, asymmetrical body.
For components that require geometric accuracy, such as collars, lapels, and pocket flaps, the flat pattern is king. These elements rely on precise angles and measurements that are most reliably achieved with a ruler and a right angle. However, for the main shell of the jacket—the part that must conform to the unique curves of a person’s shoulders and back—draping is indispensable. Human bodies are not symmetrical. A flat pattern assumes they are. Draping allows you to see and accommodate the subtle slope of a shoulder or the curve of a spine, building a fit that is truly bespoke. Indeed, industry surveys reveal that 85% of bespoke tailors use draping for the initial fitting, a testament to its superiority in achieving a perfect, personalized fit.
This hybrid philosophy is the key to professional tailoring. The process often starts with draping the main body panels to capture the individual’s form, then transferring those shapes to paper. From there, the precise elements are drafted and integrated. The following breakdown shows when to lean on each technique:
| Garment Component | Best Technique | Reason |
|---|---|---|
| Jacket shell & shoulders | Draping | Accommodates body asymmetries |
| Collar & lapels | Flat pattern | Requires mathematical precision |
| Canvas interfacing | Draping | See 3D roll and hang behavior |
| Pockets & details | Flat pattern | Standardized placement needed |
| Sleeve pitch | Draping | Natural arm position varies |
Key takeaways
- Draping is a ‘fabric dialogue’ that teaches material intelligence, a skill sketches and software cannot replicate.
- The process forces an immediate confrontation with gravity and fabric personality, closing the gap between 2D vision and 3D reality.
- Mastering draping unlocks the ability to discover ‘unplannable shapes’ and organic forms that are impossible to draw.
Why Virtual Sampling Is Not Yet Enough to Replace Physical Prototypes?
In our increasingly digital world, it’s tempting to believe that software like CLO 3D can replace the « messy » and time-consuming process of physical prototyping. These programs are powerful tools; they can render a garment with impressive realism and help identify major fit issues long before a single piece of fabric is cut. They can simulate a monologue, showing you what a design will look like. But fashion is not just about what a garment looks like; it’s about how it feels, moves, and lives. And for that, virtual sampling is still just a sophisticated echo of the real thing.
The primary limitation of virtual sampling is the absence of true tactile feedback. As a Digital Fashion Technology Expert eloquently puts it, « Software can show you how a garment looks, but it can’t tell you how it feels to wear—the weight on the shoulders, the restriction of movement, the texture against the skin. » This sensory information is not a trivial detail; it is the essence of clothing. A virtual drape cannot replicate the subtle resistance of heavy wool, the cool slip of silk, or the unexpected stiffness of a particular interfacing. Professional studios consistently find that for complex structures like tailored jackets or the delicate fall of a bias cut, physical prototypes remain essential for final validation.
This is not to dismiss digital tools, but to place them in their proper context. They are a powerful aid to the design process, excellent for quick visualization and iteration. They can augment the pattern-making stage and reduce waste. But they cannot replace the foundational knowledge that comes from the hands-on, physical dialogue with fabric. The intuition you build by draping—your material intelligence—is what allows you to critically assess a digital simulation. You will know, from experience, if the software’s depiction of a fabric’s drape feels authentic or not. Draping teaches you the laws of physics that the software is trying to imitate, making you a smarter, more discerning user of the technology.
To truly master the art of garment creation, embrace the tactile world. Let your hands learn the language of fabric, a language of weight, tension, and flow that will make your designs not just look right, but feel alive.